
Introduction to Building a NAS
Table of Contents
Are you planning to build a Network Attached Storage (NAS) for your home or small office use? A NAS can be a great way to store and access files from multiple devices without relying on third-party cloud services.
As a Taekwondo practitioner and an IT professional, I understand the significance of technology in martial arts. While Taekwondo has been a significant part of my life for three decades, my professional journey has revolved around technology since 2004. In this unique blog, I will explore the intersection of Taekwondo and IT, shedding light on technology’s crucial role in running a successful Taekwondo school and managing data for personal and professional use.
Through this blog, I will delve into the diverse aspects of IT that impact Taekwondo, including data management, accessibility, and the challenges faced in balancing both worlds. Join me on this journey as we explore the fusion of Taekwondo and technology, uncovering innovative ways to enhance training, streamline operations, and embrace the digital evolution of this ancient martial art.
My chosen Components
Intel Z370 LGA 1151 Motherboard For ASRock Z370M-ITX/ac Motherboard 2×DDR4 32GB PCI-E 3.0 M.2 USB3.1 Mini-ITX
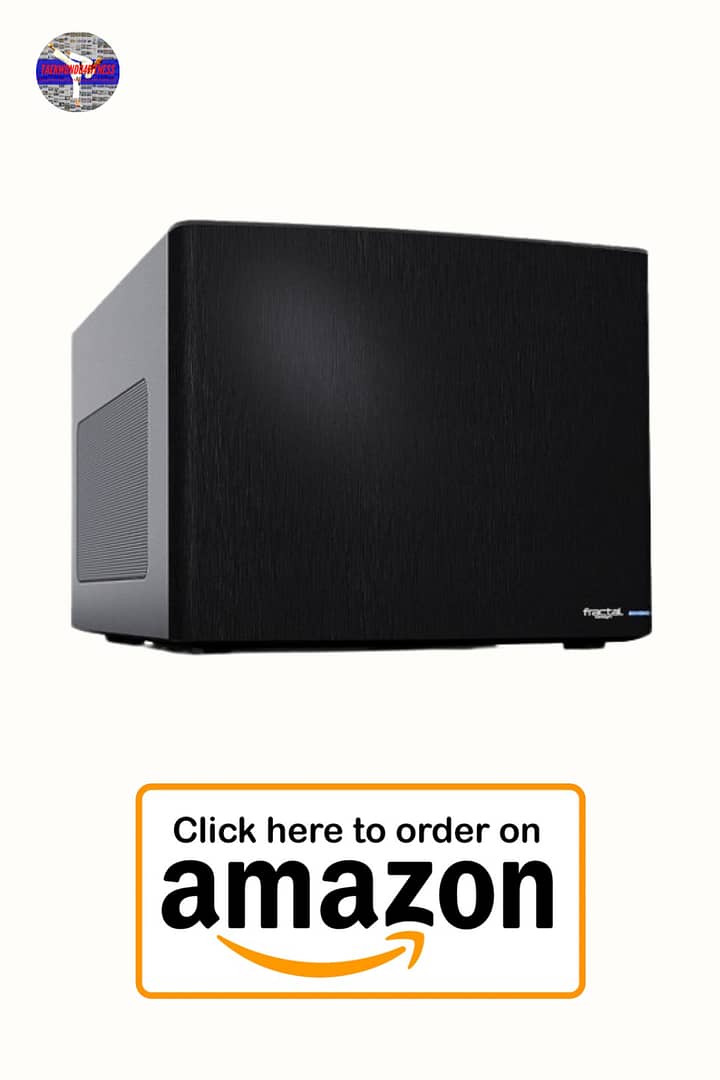
Fractal Design FDE Node 304 White mini ITX/ mini DTX FD-CA-NODE-304-WH
ZoeRax M.2 SSD NVMe HeatSink M2 2280 Solid State Hard Disk Aluminum Heatsink Gasket with Thermal Silicone Pad PC Accessories
SNOWMAN 6 Heat Pipes CPU Cooler 4 Pin PWM RGB PC Quiet Intel LGA 1700 2011 1200 1150 1151 X79 X99 E5 AMD AM3 AM4 CPU Cooling Fan
SSD Internal SATA3 Solid State Drive 2.5 512GB SSD Laptop
be quiet! STRAIGHT POWER 11 PC Netzteil ATX 550W mit Kabelmanagement 80plus Gold BN281 schwarz
[DDR4 RAM] Gigastone Desktop RAM 32GB (2x16GB) DDR4 Ram 32GB DDR4-2666MHz PC4-21300 CL19 1.2V UDIMM 288 Pin/Polig Ungepuffert Nicht-ECC Computer Speicher RAM
CPU Silver Conductor Paste/Silver Thermal Grease Compound PC Heat Sink GPU Xbox
4 x Western Digital Ultrastar DC HC510 10TB, SATA3 (HUH721010ALE604) Recertified
Intel Core i7-8700T ES QN8J 6C 1.6GHz-3.4GHz LGA1151 35W Low Powered i7-8700K
Building a NAS (Network Attached Storage) Server with Intel Z370 LGA 1151 Motherboard

Welcome to my latest blog post, where we delve into the world of NAS (Network Attached Storage) servers. As a devoted user and enthusiast, I have witnessed the evolution of NAS technology over the years. One of my earliest encounters was with the highly popular D-LINK DNS-323, released in October 2007.
As time passed, I upgraded to the sleek and silent QNAP HS-251, a 2-bay NAS that improved functionality and added a touch of elegance to my setup. My thirst for more features led me to the TS-453A, another remarkable QNAP device packed with additional bells and whistles. However, as the years went by, I gradually realized the limitations of these off-the-shelf NAS units. While they were excellent products, renowned brands often imposed restrictions on hardware upgrades, such as RAM or disk space expansion, making it challenging or even impossible.
As a tech enthusiast, I saw this as a challenge. I needed a solution that could adapt to my expanding storage requirements and the need for more power. I desired a NAS that offered flexibility in terms of part replacement and upgradability, one that could withstand the test of time and keep up with the fast-paced tech landscape.
And so, I took matters into my own hands. I decided to construct a custom NAS server—a system providing the versatility and long-term scalability I craved. Prepare yourself for an exciting journey as we create a NAS solution tailored to your needs! This blog post serves as a dedicated guide to help you through this process, using the Intel Z370 LGA 1151 Motherboard as the foundation of our NAS build.
Building a Network Attached Storage (NAS) system is ideal for individuals or businesses seeking efficient storage, seamless file sharing, and convenient access to extensive amounts of data. The advantages of constructing a NAS system include easy file accessibility, data redundancy and backup, enhanced data security, and significant cost savings.
This blog will primarily focus on constructing a high-performance NAS system utilizing some of the finest components available. Our chosen features for this build include the Intel Z370 LGA 1151 motherboard, a compact mini ITX/DTX case from Fractal Design, a powerful CPU cooler from SNOWMAN, high-capacity 10TB hard drives from Western Digital, and a 10Gb network card from Inspur.
Additionally, we will discuss selecting the appropriate components for your NAS build, their installation and configuration, and troubleshooting common issues that may arise during the setup. By the end of this blog, you will have a comprehensive understanding of how to construct a high-performance NAS system that aligns perfectly with your data storage and sharing requirements.
Advantages of Building a NAS with Intel Z370 LGA 1151 Motherboard
Building a NAS with Intel Z370 LGA 1151 Motherboard has several advantages, such as:
Cost-effective: Building a NAS yourself can be more cost-effective than buying a pre-built NAS from a manufacturer.
Customization: You can customize the components and storage capacity of the NAS according to your needs.
Data Security: By hosting your data on a NAS, you can ensure that your data is secure and not accessible to unauthorized users.
Data Accessibility: With a NAS, you can access your data from multiple devices, including smartphones, laptops, and tablets, without relying on third-party cloud services.
Easy to Expand: You can quickly expand the storage capacity of the NAS by adding more hard drives or replacing the existing ones with higher-capacity drives.
Final Words
Building a NAS with Intel Z370 LGA 1151 Motherboard can be a great way to store and access files from multiple devices. It can be a challenging but rewarding DIY project that can save you money and offer a high level of customization. Ensure you follow the steps, tips, and troubleshooting measures above to build a reliable and efficient NAS that meets your storage needs.
If you’re interested in purchasing an Intel Z370 LGA 1151 Motherboard or any other components for your NAS project, you can check out the wide selection available on Amazon. As an Amazon Associate, I earn from qualifying purchases made through the links provided. By using this link you can support this website and help us continue providing helpful content.
Thank you for your support, and happy building!
Choosing the correct motherboard for the build
A motherboard, including a NAS build, is the heart of any computer system. Choosing a motherboard that can provide stable and reliable performance, has enough expansion options, and can support the other components you plan to use in your build is essential.
Why Intel Z370 LGA 1151 motherboard is a good choice:
The Intel Z370 LGA 1151 motherboard is excellent for a high-performance NAS build. It supports 8th and 9th-generation Intel processors and has several features that make it ideal for a NAS system.
Firstly, it supports up to 32GB of DDR4 RAM, essential for a high-performance NAS system. It also has multiple M.2 slots, which can be used to install high-speed NVMe SSDs for faster data transfer and improved system performance.
Additionally, the Z370 chipset supports PCI-E 3.0, allowing faster data transfer speeds between components and making it ideal for a high-performance NAS system.
Features and specifications of the ASRock Z370M-ITX/ac motherboard:
The ASRock Z370M-ITX/ac motherboard is an excellent choice for a high-performance NAS build. Its features make it stand out from other mini ITX motherboards.
Firstly, it supports 8th and 9th-generation Intel processors, allowing users to choose the processor that suits their needs. It also supports up to 32GB of DDR4 RAM and has two M.2 slots for high-speed NVMe SSDs.
Furthermore, the ASRock Z370M-ITX/ac motherboard has built-in Wi-Fi and Bluetooth connectivity, allowing users to connect their NAS to their network wirelessly. It also has multiple USB 3.1 Gen1 and Gen2 ports, making connecting external storage devices, printers, and other peripherals easy.
How to install the IO I/O shield back plate backplate bracket motherboard blank baffle:
The IO I/O shield back plate backplate bracket motherboard blank baffle is an essential component that helps protect the motherboard from dust and debris while providing a stable surface to attach external connectors.
To install the IO I/O shield, first, remove the protective cover from the shield’s sticky side. Then align the shield with the corresponding cutouts on the back of the case and gently press it into place. Ensure the shield is securely attached to the case to prevent unwanted movement during the build process.
Once the shield is in place, install the motherboard onto the standoffs on the case and align the back panel connectors with the cutouts on the IO shield. Secure the motherboard in place with screws, and the IO shield will be firmly attached to the case.
Selecting the proper case for the NAS
Selecting the proper case is crucial when building a NAS system. It should provide adequate space for all the components, have good ventilation to keep the system cool, and have enough storage bays to accommodate the number of hard drives you plan to use.
Benefits of using a mini ITX/DTX case for a NAS
A mini ITX/DTX case is an excellent choice for a NAS build due to its compact size, which makes it easy to store and transport. Additionally, these cases are designed to support mini ITX/DTX motherboards, which are smaller and consume less power, making them ideal for a NAS system.
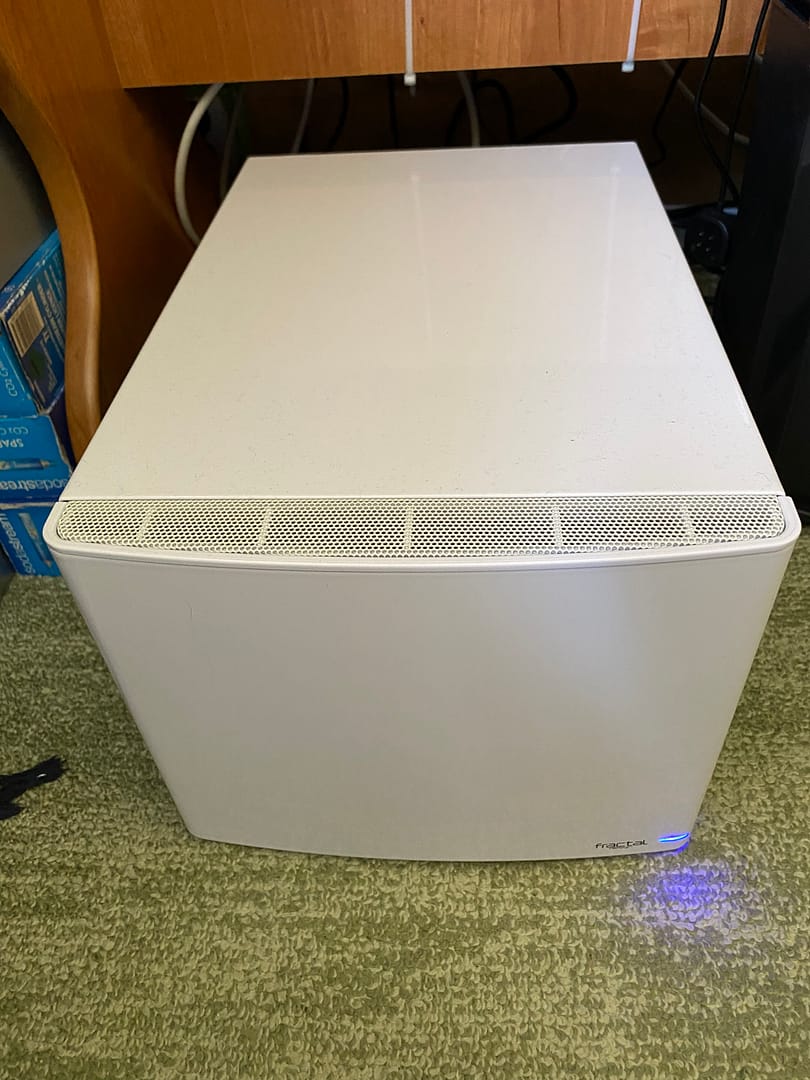
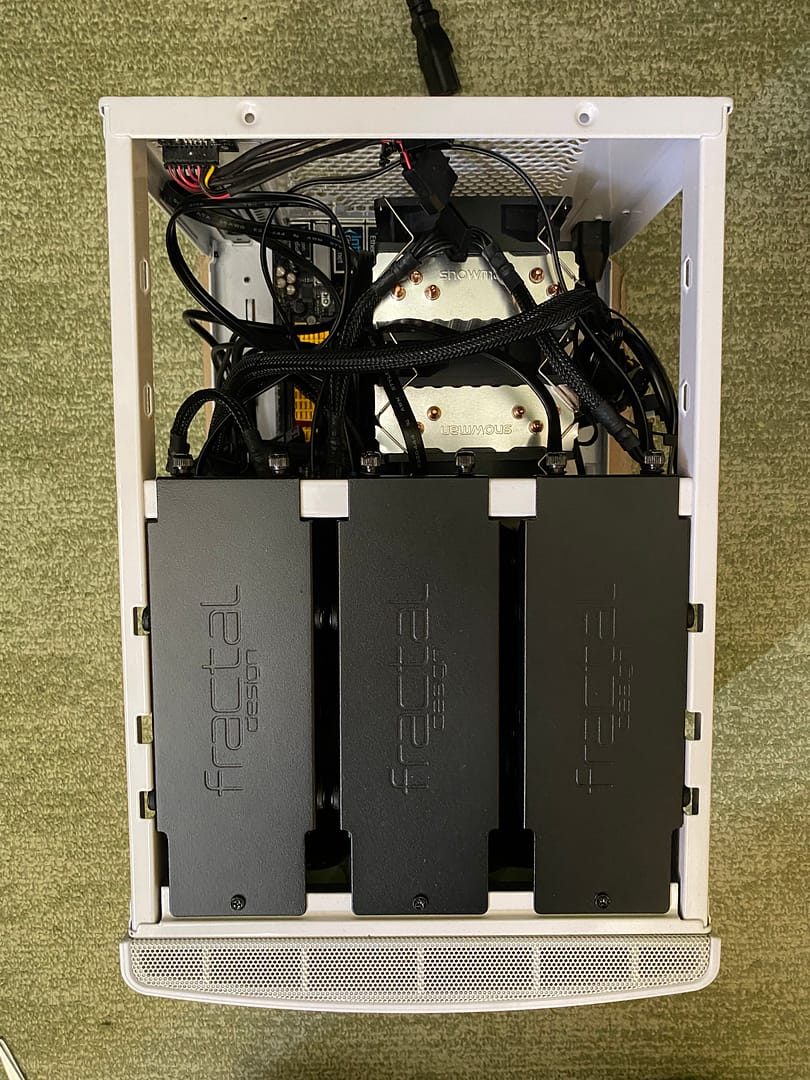
Features and specifications of the Fractal Design Node 304 case
The Fractal Design Node 304 case is excellent for a high-performance NAS build. Its features make it stand out from other mini ITX/DTX cases.
Firstly, it has six hard drive bays, accommodating up to six 3.5″ or 2.5″ hard drives, providing ample storage for a NAS system. It also has two additional dedicated SSD bays, which can be used to install high-speed NVMe SSDs for faster data transfer and improved system performance.
Furthermore, the Fractal Design Node 304 case has excellent ventilation, with three pre-installed 92mm fans and a dust filter, ensuring the system stays cool and dust-free. It also has two USB 3.0 ports and audio jacks on the front panel, making connecting external storage devices, headphones, and microphones easy.
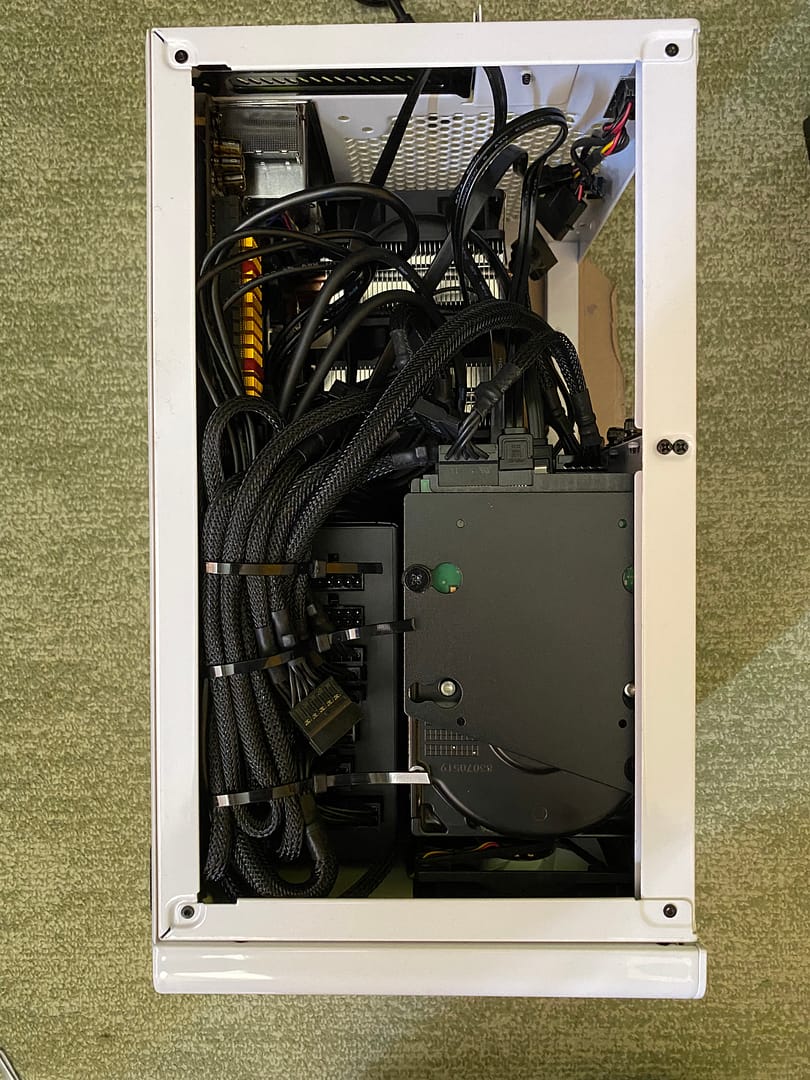
How to install the motherboard and other components into the case
First, remove the side panels to install the motherboard and other components into the Fractal Design Node 304 case. Then, install the IO shield onto the case’s back panel, ensuring it’s aligned with the motherboard’s connectors.
Next, carefully place the motherboard onto the standoffs in the case, ensuring that it is aligned with the IO shield. Then, secure the motherboard to the case using screws.
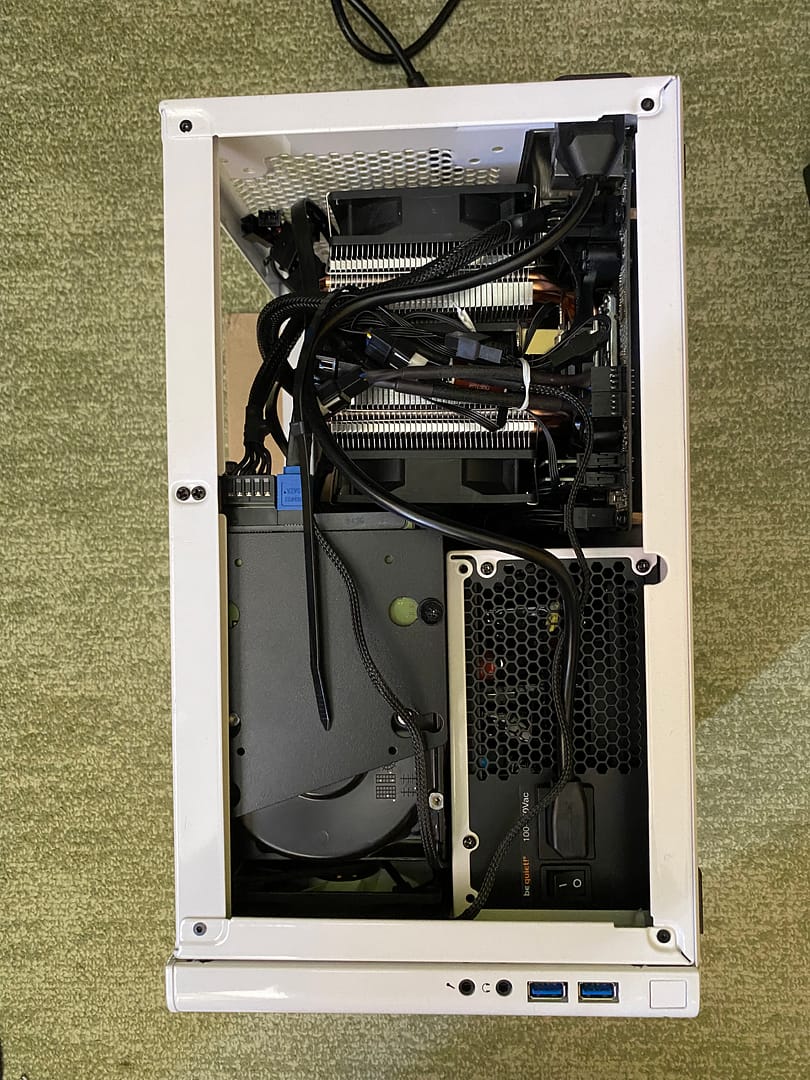
Install the CPU cooler onto the motherboard, ensuring it is firmly attached and in contact with the CPU. Also, install the M.2 SSD NVMe heatsink onto the motherboard, ensuring it is in connection with the NVMe SSD.
Once the motherboard and other components are installed, install the hard drives into the drive bays, ensuring they are securely in place. Connect the SATA data and power cables to the hard drives and motherboard. Finally, connect all the necessary wires from the power supply to the motherboard and other components, and the build process is complete.
Cooling the NAS components
Cooling is essential to any computer system, including a NAS build. A well-designed cooling system is crucial for maintaining stable and reliable performance, preventing damage to components due to overheating, and extending the system’s lifespan.
Importance of cooling for NAS performance and longevity

A NAS system typically operates 24/7 and can generate considerable heat due to the high workload. Overheating can cause the system to slow down or even shut down, leading to data loss or corruption. Additionally, high temperatures can cause damage to the system’s components, shortening their lifespan.
The SNOWMAN 6 heat pipes CPU cooler is an excellent choice for a high-performance NAS build. Its features make it ideal for cooling the CPU effectively and efficiently. Features and specifications of the SNOWMAN 6 heat pipes CPU cooler:
Firstly, it has six heat pipes that make direct contact with the CPU, ensuring that heat is transferred quickly and efficiently away from the CPU. It also has a large heatsink with a high-density fin structure, which provides a large surface area for heat dissipation.
Furthermore, the SNOWMAN 6 heat pipes CPU cooler has a 120mm fan with PWM control, allowing automatic fan speed adjustment based on CPU temperature. The fan is also designed to be quiet, making it ideal for a quiet NAS build.
How to install the CPU cooler and M.2 SSD NVMe heatsink

Since I chose a radiator with three fans, I had to remove the chassis fan from the Fractal Design Node 304 case.


To install the SNOWMAN 6 heat pipes CPU cooler, first, apply thermal paste to the surface of the CPU. Then, place the cooler on top of the CPU, ensuring that the heat pipes directly interact with the CPU.
Once the CPU cooler is securely in place, install the M.2 SSD NVMe heatsink onto the motherboard, ensuring it is in contact with the NVMe SSD. It’s important to note that the heatsink should be installed before the NVMe SSD to ensure proper connection between the heatsink and SSD.
Finally, connect the fan’s power cable to the motherboard’s fan header, and the cooling system is ready. Ensuring the cooling system works correctly by regularly monitoring the CPU and system temperatures is essential.
Powering the NAS
The power supply, including a NAS build, is critical to any computer system. It provides the necessary power to all the components, and selecting the correct power supply is essential for maintaining stable and reliable performance.
Importance of selecting the proper power supply for the build
Choosing the appropriate power supply is crucial for a NAS build, ensuring the system has enough power to operate all the components effectively. A power supply that is too weak can cause instability and may lead to system crashes or data loss. Additionally, a power supply that is too powerful can waste energy and increase electricity costs.
Features and specifications of the be quiet! STRAIGHT POWER 11 PC Netzteil ATX 550W:
Be quiet! STRAIGHT POWER 11 PC Netzteil ATX 550W is an excellent choice for a high-performance NAS build. Its features make it ideal for powering the system effectively and efficiently. Unfortunately, the PSU died within only two months after purchase. In my case, a replacement unit was received within a week. On average, a high-quality power supply like this should last five to ten years or even longer. So I hope this one will last longer.
Firstly, it has a modular cable design, which means that cables can be connected or disconnected based on the components used in the build. This helps to reduce cable clutter and improve airflow, leading to better cooling and system performance.
Furthermore, be quiet! STRAIGHT POWER 11 PC Netzteil ATX 550W has an 80 PLUS Gold certification, which means it is highly efficient, reducing electricity costs and environmental impact. It also has a silent 135mm fan that operates quietly, making it ideal for a quiet NAS build.

How to install and connect the power supply to the components
To install the be quiet! STRAIGHT POWER 11 PC Netzteil ATX 550W, first, position it in the case in the power supply bay. Then, use screws to secure the power supply to the case.
Next, connect the necessary cables from the power supply to the motherboard and other components. The motherboard requires a 24-pin ATX power cable and an 8-pin CPU power cable. The hard drives require SATA power cables, and the graphics card, if used, requires a PCI-E power cable.
It’s essential to ensure that all the cables are securely connected to the components to prevent accidental disconnection. Additionally, it’s necessary to route the cables neatly to ensure proper airflow and to avoid interference with the system’s components.
Finally, turn on the power supply and the system, and monitor the system’s performance and temperature to ensure that the power supply is operating correctly.
Adding storage to the NAS
Adding storage is one of the primary reasons for building a NAS system. Selecting suitable hard drives for the build is essential to ensure the system can store and retrieve data efficiently and reliably. As I have a radiator with three fans for cooling the CPU, I had to do some tweaking to install four HDDs and two SSDs. For the NVME SSD storage, I used the free slot on the motherboard.
Importance of selecting the suitable hard drives for the NAS
Choosing the right hard drives is crucial for a NAS build as they are the primary storage medium for the system. Hard drives not designed for continuous operation or incompatible with the NAS system can lead to data loss or corruption. Additionally, low-quality or unreliable hard drives can increase maintenance and replacement costs.
Features and specifications of the Western Digital Ultrastar DC HC510 10TB SATA3 hard drives

The Western Digital Ultrastar DC HC510 10TB SATA3 hard drives are an excellent choice for a high-performance NAS build. They have several features that make them ideal for storing large amounts of data efficiently and reliably.
Firstly, they are designed for continuous operation, with a workload rating of up to 550TB per year, making them ideal for NAS systems. They also have a large capacity of 10TB, providing ample storage space for a high-performance NAS system.
Furthermore, the Western Digital Ultrastar DC HC510 10TB SATA3 hard drives have a SATA3 interface, providing fast data transfer speeds of up to 6 Gb/s. They also have a rotational speed of 7200 RPM, ensuring quick access to data.
How to install and configure the hard drives for use in the NAS
To install the Western Digital Ultrastar DC HC510 10TB SATA3 hard drives, first open the drive bays in the case and slide the hard drives into the bays until they click into place. Then, secure the hard drives to the case using screws.
Next, connect the SATA data and power cables to the hard drives, ensuring they are securely connected. It’s important to note that SATA cables should be connected to the motherboard’s SATA ports, designed for RAID, to ensure proper configuration and operation of the hard drives.
Once the hard drives are connected, configure them using the NAS system’s software, such as RAID or Storage Spaces. It’s important to note that data redundancy and backup should be set up to protect against data loss or corruption.
Finally, monitor the hard drives’ performance and temperature regularly to ensure they are operating correctly and not in danger of failing. It’s essential to promptly replace any failing hard drives to prevent data loss or corruption.
Adding network connectivity to the NAS
Network connectivity is vital in a NAS build, allowing seamless system access and usage by multiple users or devices. Adding a high-speed network card can significantly enhance the performance and reliability of your NAS. However, in my recent experience, the Inspur YZCA-00311-101 10Gb network card did not function as expected in my setup, prompting me to seek alternative solutions. In this blog post, I will share my journey of troubleshooting and the importance of finding a reliable network card for optimal NAS performance.
The Benefits of a 10Gb Network Card
A 10Gb network card offers numerous advantages for a NAS system, including enhanced performance and responsiveness. It enables faster data transfers, making it ideal for large file transfers or backups. Additionally, a 10Gb network card supports multiple users or devices concurrently, ensuring smooth operations even during heavy workloads.
The Inspur YZCA-00311-101 10Gb Network Card
Features and Specifications: The Inspur YZCA-00311-101 10Gb network card is designed to provide high-performance network connectivity for NAS builds. It offers several features that contribute to improved network performance.
The network card utilizes a PCIe interface, guaranteeing a fast and reliable connection to the motherboard. Its dual RJ45 ports allow for multiple connections and offer redundancy, ensuring uninterrupted network access.
Equipped with a high-speed X540-T2 controller, the Inspur YZCA-00311-101 network card boasts up to 10 Gb/s data transfer speeds. Advanced features like TCP/UDP/IP checksum offload help optimize system performance by reducing CPU utilization.
Troubleshooting the Inspur YZCA-00311-101 Network Card
I encountered unexpected issues after installing the Inspur YZCA-00311-101 network card and booting up my NAS. The system would shut down shortly after startup, indicating a compatibility or configuration problem. Despite troubleshooting attempts, the network card did not function as intended in my specific setup. For this reason, before upgrading to a 2.5 or 10GB network, I will search for an alternative solution.
Exploring Alternative Solutions:

Given the challenges faced with the Inspur YZCA-00311-101 network card, I realized the need to search for alternative options to ensure reliable network connectivity for my NAS builds. This would involve researching and testing different network card models compatible with my system and meeting my performance requirements.
Considerations for Optimal Network Card Performance
When choosing a network card, it’s crucial to assess its compatibility with your NAS system, including its PCIe slot availability and support. Additionally, evaluating the network infrastructure, such as switches and routers, is essential to ensure they can fully utilize the network card’s capabilities.
Conclusion
While the Inspur YZCA-00311-101 10Gb network card improved network performance in my NAS build, it did not work as expected in my specific setup. This experience has highlighted the importance of thorough troubleshooting and exploring alternative network card options. By investing time in researching and testing compatible network cards, you can ensure optimal network connectivity, performance, and reliability for your NAS system.
Adding RAM to the NAS
RAM, including a NAS build, is essential to any computer system. Enough RAM is crucial for maintaining stable and reliable performance, especially for high-performance NAS systems that simultaneously handle heavy workloads and multiple users or devices.
Importance of having enough RAM for a high-performance NAS
RAM is the system’s primary memory, and having enough RAM is crucial for keeping the system responsive and efficient. Insufficient RAM can cause the system to slow down or even crash, leading to data loss or corruption. Additionally, a lack of RAM can increase CPU utilization, reducing the system’s overall performance.
Features and specifications of the Gigastone Desktop RAM 32GB (2x16GB) DDR4 Ram

The Gigastone Desktop RAM 32GB (2x16GB) DDR4 Ram is an excellent choice for a high-performance NAS build. Its features make it ideal for improving the system’s memory and performance.
Firstly, it has a high capacity of 32GB, providing ample memory for a high-performance NAS system. It also has a DDR4 memory type, ensuring fast and efficient data transfer.
Furthermore, the Gigastone Desktop RAM 32GB (2x16GB) DDR4 Ram has a memory clock speed of 2666MHz and a CL19 latency, ensuring quick and responsive system performance.
How to install the RAM onto the motherboard
First, locate the RAM slots on the motherboard to install the Gigastone Desktop RAM 32GB (2x16GB) DDR4 Ram onto the motherboard. Typically, they are located near the CPU socket.
Next, unlock the RAM slots by pushing down the clips at the end of the slot. Then, align the notches on the RAM module with the notches on the slot and insert the RAM module into the slot at a slight angle. Push down firmly until the clips at the end of the slot snap into place, securing the RAM module in place.
Repeat the process for the second RAM module if using dual-channel memory. It’s essential to use identical RAM modules to ensure proper compatibility and operation.
Finally, power on the system and check the system properties to ensure that the RAM is recognized and configured correctly. It’s important to note that the system may require a BIOS update to support the new RAM modules. Check the motherboard manufacturer’s website for the latest BIOS update and instructions on how to update the BIOS.
Conclusion
In conclusion, building a NAS system requires carefully selecting components to ensure stable and reliable performance. The components used in this build include the Intel Z370 LGA 1151 motherboard, Fractal Design Node 304 case, Western Digital Ultrastar DC HC510 10TB SATA3 hard drives, and the be quiet! STRAIGHT POWER 11 PC Netzteil ATX 550W power supply, among others, provides an excellent foundation for a high-performance NAS build – the importance of selecting the right components and their features and specifications.
We explored the benefits of using a mini ITX/DTX case for a NAS, the importance of cooling for NAS performance and longevity, the benefits of using a 10Gb network card, and the importance of having enough RAM for a high-performance NAS.
In summary, by carefully selecting high-quality components and properly installing and configuring them, you can build a high-performance NAS system that can handle heavy workloads, provide reliable data storage, and improve your overall computing experience. With the right components, a NAS build can be an excellent investment for personal or business use, providing significant benefits over traditional storage solutions.
Steps for Building a NAS Server with Intel Z370 LGA 1151 Motherboard
- Unbox and prepare all the components required for building the NAS.
- Mount the IO I/O shield backplate bracket onto the ASRock Z370M-ITX/ac motherboard.
- Mount the motherboard onto the Fractal Design FDE Node 304 white mini ITX/ mini DTX case.
- Install the ZoeRax M.2 SSD NVMe heatsink onto the M.2 SSD.
- Install the SNOWMAN 6 heat pipes CPU cooler onto the Intel Core i7-8700T ES QN8J CPU.
- Install the 32GB DDR4 RAM onto the motherboard.
- Install the SSD onto the motherboard.
- Connect the Ribbon FPV HDMI-compatible connector flexible flat cable from the motherboard to the back of the case.
- Connect the SATA data cables from the motherboard to the 4 x Western Digital Ultrastar DC HC510 10TB hard drives.
- Connect the SATA power cables from the power supply to the hard drives.
- Connect the 24-pin ATX and 8-pin CPU power cables from the power supply to the motherboard.
- Apply the CPU silver conductor paste or silver thermal grease compound onto the CPU before mounting the CPU cooler.
- Mount the be quiet! STRAIGHT POWER 11 PC Netzteil ATX 550W power supply onto the case.
- Connect all the necessary power cables to the power supply, including the 10Gb network card and the case fans, if any.
- Close the case and power on the NAS.
Conclusion
Building a NAS with Intel Z370 LGA 1151 Motherboard can be a great DIY project. You can have a reliable and efficient NAS for your home or small office use with the right components and proper assembly. Ensure you follow the steps above carefully to avoid damage to the components and ensure the NAS functions correctly.
Tips and Recommendations
Here are some tips and recommendations to help you with your NAS build:
Ensure you use an anti-static wristband or regularly ground yourself to prevent damage to the components due to static electricity.
Use good quality thermal paste or thermal grease to ensure that the CPU cooler efficiently dissipates heat from the CPU.
Consider using a UPS (Uninterruptible Power Supply) to protect your NAS from sudden power outages or voltage fluctuations.
Use a good quality Ethernet cable and a compatible router to ensure the 10Gb network card functions efficiently.
Ensure you use all components’ latest firmware and drivers to avoid compatibility issues.
Final Thoughts
Possible Challenges and Troubleshooting
Building a NAS can be challenging, and you may encounter some issues. Here are some possible challenges and their troubleshooting steps:
- BIOS configuration: If you encounter any issues with BIOS configuration, check the motherboard manual and follow the instructions carefully. You may also need to update the BIOS to ensure the components function correctly.
- Overheating: If the NAS overheats, it may result in component damage or system instability. Ensure you use a good CPU cooler, case fans, and thermal paste to prevent overheating. You can also install temperature monitoring software to keep track of the temperature.
- Power Supply Issues: If you encounter any power supply issues, check the power cables, power supply compatibility, and power supply capacity. If necessary, replace the power supply with a higher-wattage unit.
- Driver and firmware issues: Ensure you download the latest drivers and firmware for all the components from the manufacturer’s website. You may also need to update the operating system to ensure the components function correctly.
Conclusion
Building a NAS with Intel Z370 LGA 1151 Motherboard can be a challenging but rewarding DIY project. Ensure that you follow the steps and tips mentioned above and troubleshoot any issues that may arise to ensure that the NAS functions optimally. You can have a reliable and efficient NAS for your home or small office use with the right components and proper assembly.
Choosing the Right NAS Operating System: Navigating Challenges and Configuration
Introduction: Setting up a custom NAS (Network Attached Storage) system can be daunting, particularly when selecting the right operating system (OS) and configuring it to meet your specific needs. In this blog post, I will share my journey of exploring various NAS operating systems, my challenges, and how I eventually found a solution that provided the flexibility and functionality I sought.
Initial Choice
TrueNAS as a Single OS When I built my custom NAS setup, I initially opted for TrueNAS as my primary operating system. TrueNAS is renowned for its robust features, security, and ease of use. However, I soon discovered that certain limitations hindered my ability to achieve the desired customization and flexibility.
Exploring Alternatives
OpenMediaVault and More To ensure I made an informed decision, I decided to test out alternative NAS operating systems in a virtual machine environment. OpenMediaVault and several other options were on my list. While these operating systems had their merits, they ultimately fell short of meeting my specific requirements.
Unveiling the Challenges
Seeking Greater Flexibility Despite TrueNAS being a solid choice, I encountered various challenges that made me reconsider my decision. These challenges included limitations regarding customization options, compatibility with specific applications, and constraints on concurrently running multiple virtual machines (VMs) and containers.
Enter Proxmox

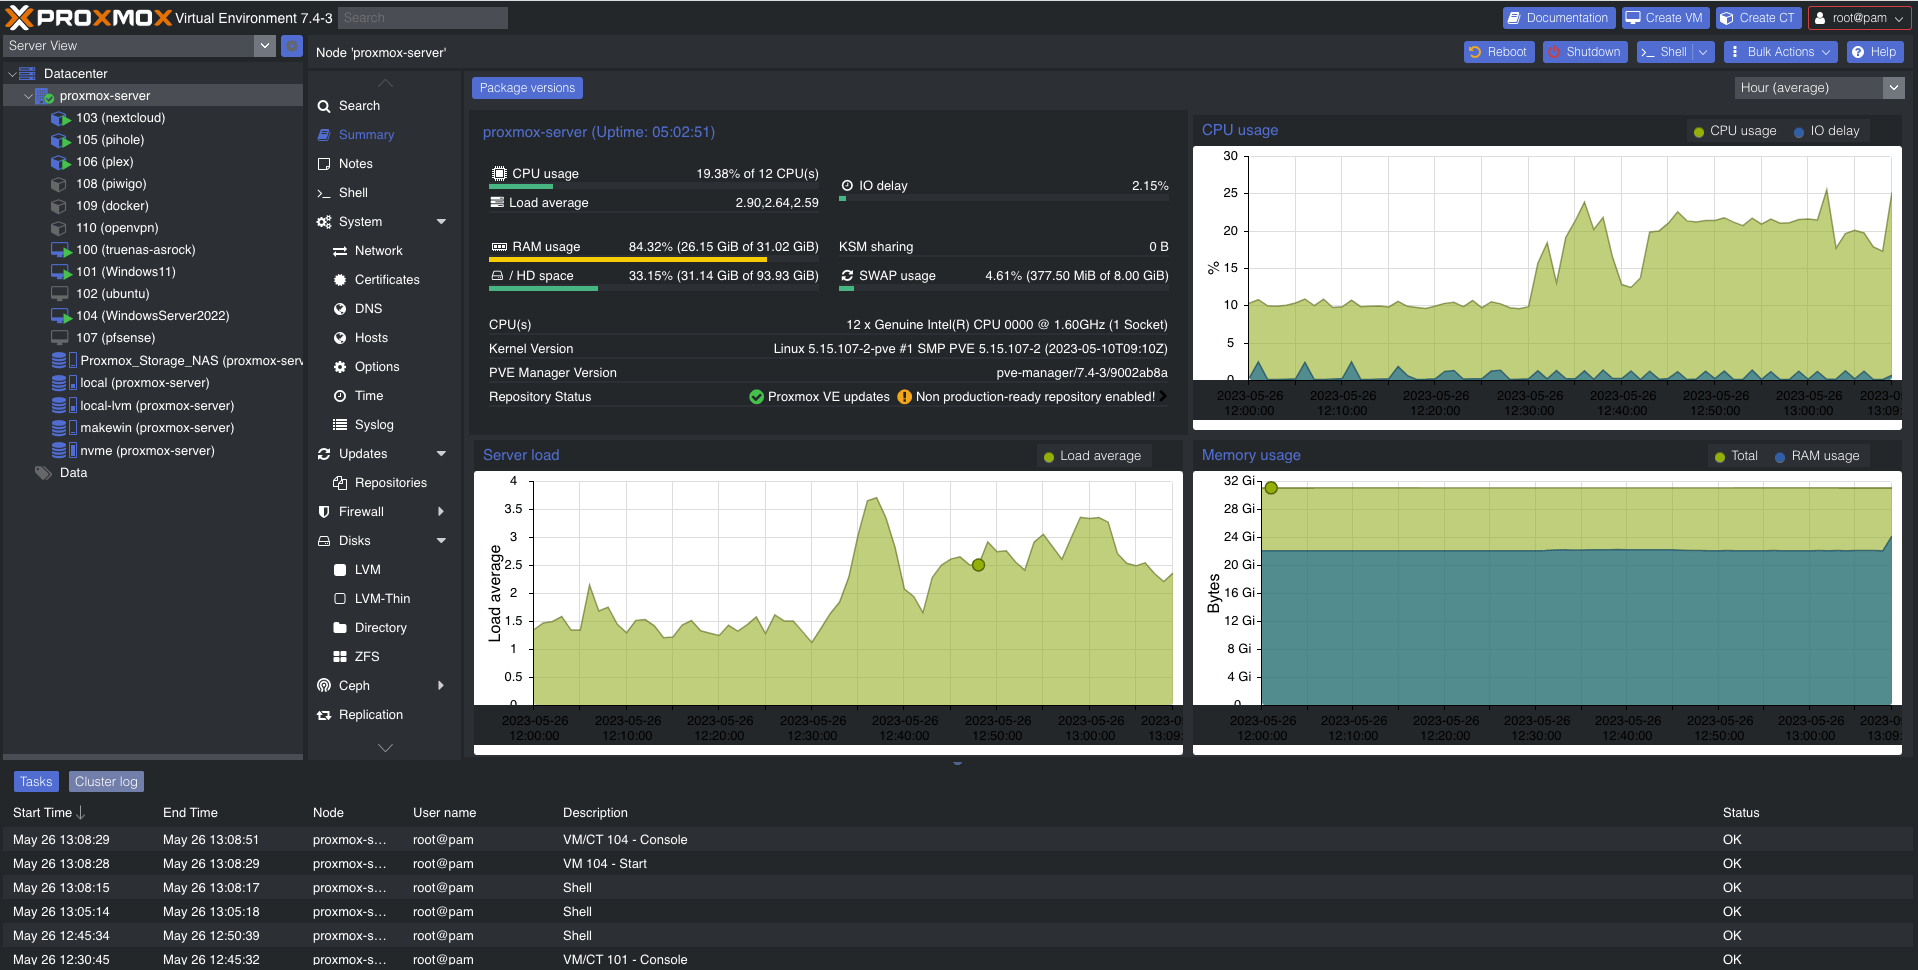
A Comprehensive Solution. In my quest for a more flexible and versatile NAS setup, I stumbled upon Proxmox, a powerful open-source virtualization platform. Proxmox offered the perfect solution by enabling me to virtualize TrueNAS alongside other operating systems, such as Windows 11, Windows Server 2022, and Ubuntu. This arrangement allowed me to run multiple VMs and containers simultaneously as a recursive DNS server, including popular tools like NextCloud, Pi-hole, and Unbound.
The Learning Curve
Transitioning from QNAP QTS As a long-term user of QNAP QTS, the transition to Proxmox and its associated configurations came with a learning curve. While TrueNAS was relatively familiar, adapting to the new environment and understanding the intricacies of Proxmox required time and effort. However, the investment proved worthwhile as it opened up a world of possibilities and expanded my NAS capabilities far beyond what TrueNAS alone could offer.
Conclusion
Choosing the right NAS operating system and configuring it to meet your specific needs can be challenging. In my case, I started with TrueNAS but soon realized that it lacked the flexibility I desired. Through thorough testing and exploration, I eventually found Proxmox—a comprehensive solution that allowed me to virtualize TrueNAS alongside other operating systems, run multiple VMs and containers concurrently, and achieve the level of customization and functionality I sought.
While the transition from my previous NAS setup came with a learning curve, the benefits of enhanced flexibility, expanded capabilities, and the ability to tailor my NAS system to my exact requirements made it all worthwhile. In the ever-evolving world of NAS, the right operating system and configuration can make all the difference in unleashing the full potential of your custom storage solution.
Current Configuration
Currently, I am utilizing a diverse range of operating systems (OS) on my primary system to support various virtual machines (VMs) and containers. These OS include TrueNAS Core, which serves as a powerful network-attached storage solution; Plex, a media server for streaming and organizing multimedia content; Nextcloud, a self-hosted cloud storage platform; Pi-Hole with Unbound, a network-wide ad blocker and DNS resolver combination; OpenVPN, a secure virtual private network service; Windows 11 and Server 2022, Microsoft’s operating systems for personal and server environments respectively; Ubuntu, a popular Linux distribution, and several others that cater to specific needs.
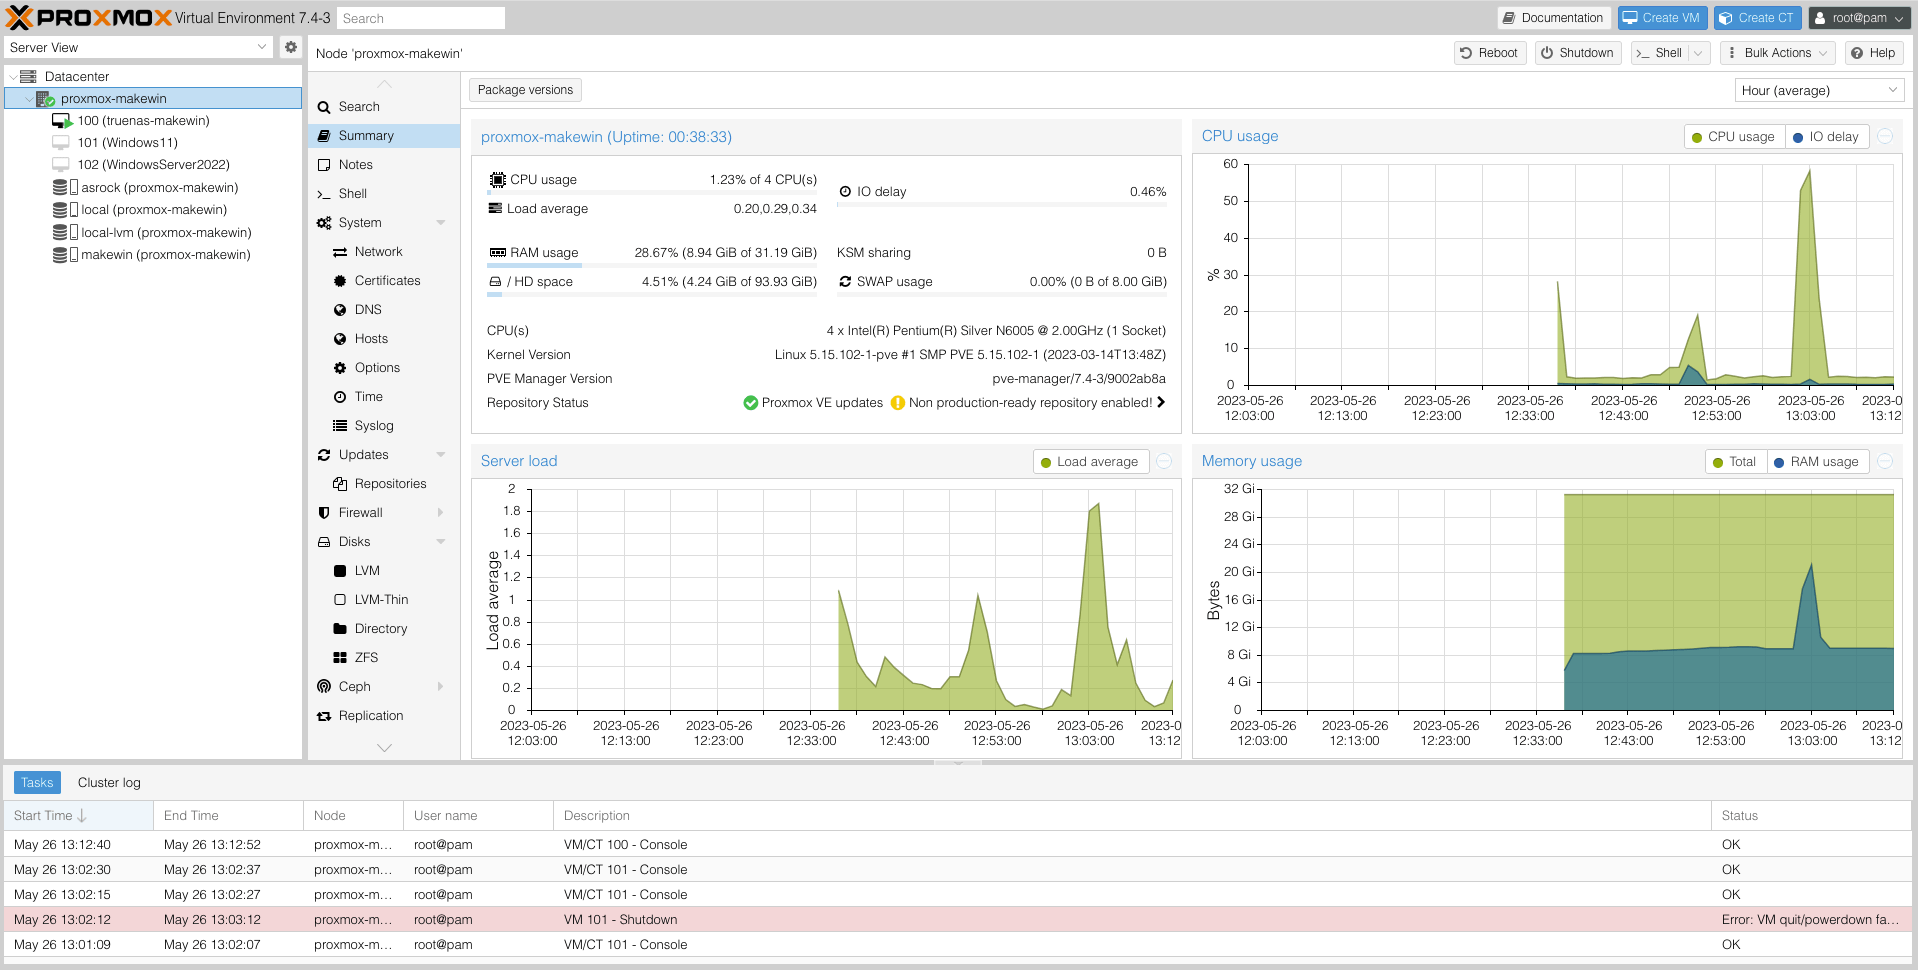
To ensure data redundancy and backup security, I have implemented a multi-tiered backup strategy. My primary backup is stored across two NAS systems. The main NAS utilizes an Asrock motherboard, while the secondary NAS is equipped with a Makewin mainboard. This setup provides redundancy in case of hardware failures or system malfunctions.
Additionally, I have set up supplementary backups on my old QNAP System and a Direct-Attached Storage (DAS) device. These additional backup solutions help safeguard critical data and provide an extra layer of protection.
By employing a combination of various OS, virtualization technologies, and backup mechanisms, I have created a robust and versatile system that caters to my diverse computing needs while ensuring the safety and integrity of my data.
Backup Rule: 2 + 1 Backups
Introduction
Regarding data backups, it’s crucial to have a reliable strategy to protect your essential information from loss or damage. The backup rule of having 2 + 1 backups is a widely recommended approach that ensures data redundancy and resilience. In this rule, the “2” represents two backup copies, while the “+1” indicates an additional backup stored offsite or in a different location.
This markdown-formatted text will delve into the benefits and implementation of the 2 + 1 backup rule. For this reason, my ASROCK NAS Server serves as the central server. I also have a second custom-built NAS that serves as a Backup-Server. The third backup is split across old NAS and DAS devices.
Benefits of the 2 + 1 Backup Rule
Redundancy:
Two backup copies create redundancy if one backup fails or becomes corrupted. This redundancy minimizes the risk of data loss. Implementing the 2 + 1 backup rule offers several advantages, including:
Data Integrity:
Having multiple backups reduces the likelihood of data corruption or errors. If one backup is compromised, you can rely on the other copies to restore your data accurately.
Resilience:
Storing an additional backup offsite or in a different location provides protection against physical disasters, such as fires, floods, or theft. It ensures your data remains safe even if your primary site is compromised.
Faster Recovery:
With multiple backup copies, you can quickly recover your data in case of accidental deletion, hardware failure, or other data loss incidents. This reduces downtime and minimizes the impact on your operations.
Implementing the 2 + 1 Backup Rule
To effectively implement the 2 + 1 backup rule, consider the following steps:
Identify Critical Data: Determine the most important data that needs to be backed up regularly. This may include documents, databases, customer information, configuration files, or other data essential for your business or personal use.
Choose Backup Locations: Decide where you will store your backup copies. It is recommended to have at least one backup stored offsite, such as in the cloud or at a remote data centre, to safeguard against physical damage or theft.
Backup Frequency: Establish a backup schedule that suits your needs. Depending on the importance and frequency of data changes, you may back up your data daily, weekly, or regularly.
Backup Methods: Select reliable backup methods based on your requirements. You can use various approaches like disk imaging, file-level backups, incremental backups, or cloud-based backup services. Ensure that your backup solutions are robust and tested regularly.
Monitor and Test: Regularly monitor your backups’ status to ensure they function correctly. Perform periodic tests to verify the integrity of your backup copies and verify that data can be restored successfully.
Conclusion
The 2 + 1 backup rule provides a robust framework for protecting your valuable data. By following this rule, you can minimize the risk of data loss, maintain data integrity, and ensure business continuity. Review and update your backup strategy periodically to adapt to changing needs and technologies.